All ins and outs of a live QandR session
Start-up and live operation
Yes, it’s always a good idea to test your session before going live.
By running through your session once, you can check if everything looks and works as expected — both on the main screen and on a participant’s phone. This helps you see whether your questions are clear and your flow makes sense.
It’s best to also join your own session on a phone, and if possible, test it together with a colleague. A fresh perspective often helps to spot things you might miss yourself.
Don’t worry about the results from your test session — these are only part of that session. When you start a new session, you begin with a clean slate.
Starting a session in QandR is simple.
Go to your dashboard, select your project, and click Start session. This creates a new live session within your project.
You can optionally give your session a name to recognise it later, but in most cases the automatic numbering is sufficient.
After that, click Open mainscreen. This opens the start screen where participants can join your session.
You can open your session a bit earlier, so participants can already log in while they enter the room.
For more details, check out the onboarding guide or watch the video tutorial.
You usually start your session shortly before it begins.
In many cases, it’s helpful to open your session a bit earlier, so participants can already join while they enter the room. This gives everyone time to connect and avoids delays at the start.
You can also open your session well in advance if needed. There is no strict timing — once your session is started, participants can join whenever they’re ready.
Yes, this is possible with the editor (use E key to open editor). Just navigate to the first visual and use the little pen in the editor to change the title
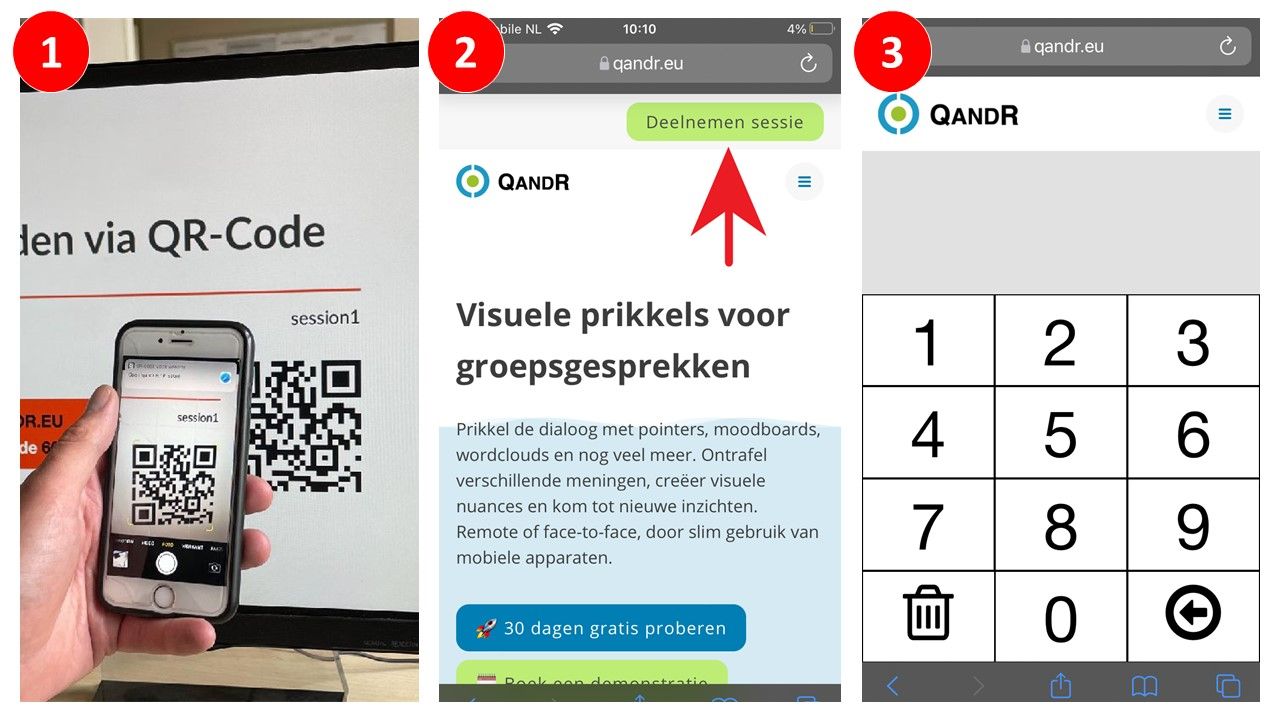
Participants can join a QandR session without installing an app or creating an account.
There are three ways to join:
The easiest and most commonly used method is by scanning the QR code shown on the main screen at the start of the session. Participants can scan the code with their phone and join immediately.
Alternatively, participants can go to the QandR join page (www.qandr.eu/en/join) on their phone or computer and enter the session code shown on the main screen.
In practice, the QR code is the quickest and most convenient option for most groups.
When you start a session, the QR code is automatically shown on the main screen. Participants can scan this code with their phone to join instantly.
If needed, you can make the QR code larger. On the start screen, you can click the QR code to enlarge it. During the session, you can press Q on your keyboard to temporarily show the QR code in a larger format — for example when people join later.
Once participants have joined, they can also help others by using the “help your neighbour” option on their phone. This shows the QR code again, making it easy for others nearby to join.
Yes, you can use a QR code in advance.
In your dashboard, you can download the Presenter QR code. This is a fixed QR code that always works for your account. You can print it, include it in a presentation, or share it beforehand.
When participants scan this code, they will be guided to your active session.
Keep in mind that the QR code shown on the session start screen is different. That code is unique for each session and changes every time you start a new one.
As a facilitator, you stay in control of what happens during the session.
You decide which format to activate and when to move to the next slide. Participants respond on their smartphones, and the results appear on the main screen.
In most cases, you guide your session step by step. If needed, you can also jump to a different slide at any time by opening the slide overview and selecting the slide you want to show.
For many formats, you can choose when to reveal the results. This allows participants to respond first, without being influenced by others, and discuss the outcomes afterwards.
This way, you control both the pace and the direction of the conversation.
The Remote Control is especially useful when you want to stay in control of your session without being tied to your laptop. You can move freely through the room and control your session from your own smartphone.
With the Remote Control, you can easily navigate through your slides (next/previous) and quickly jump to any slide in your session. You can also see incoming participant input in real time and decide what to discuss.
In addition, the presenter pointer allows you to highlight elements on screen and zoom in on details within visuals. This helps you create clarity and stay in control of the pace and direction of the session.
See also this page
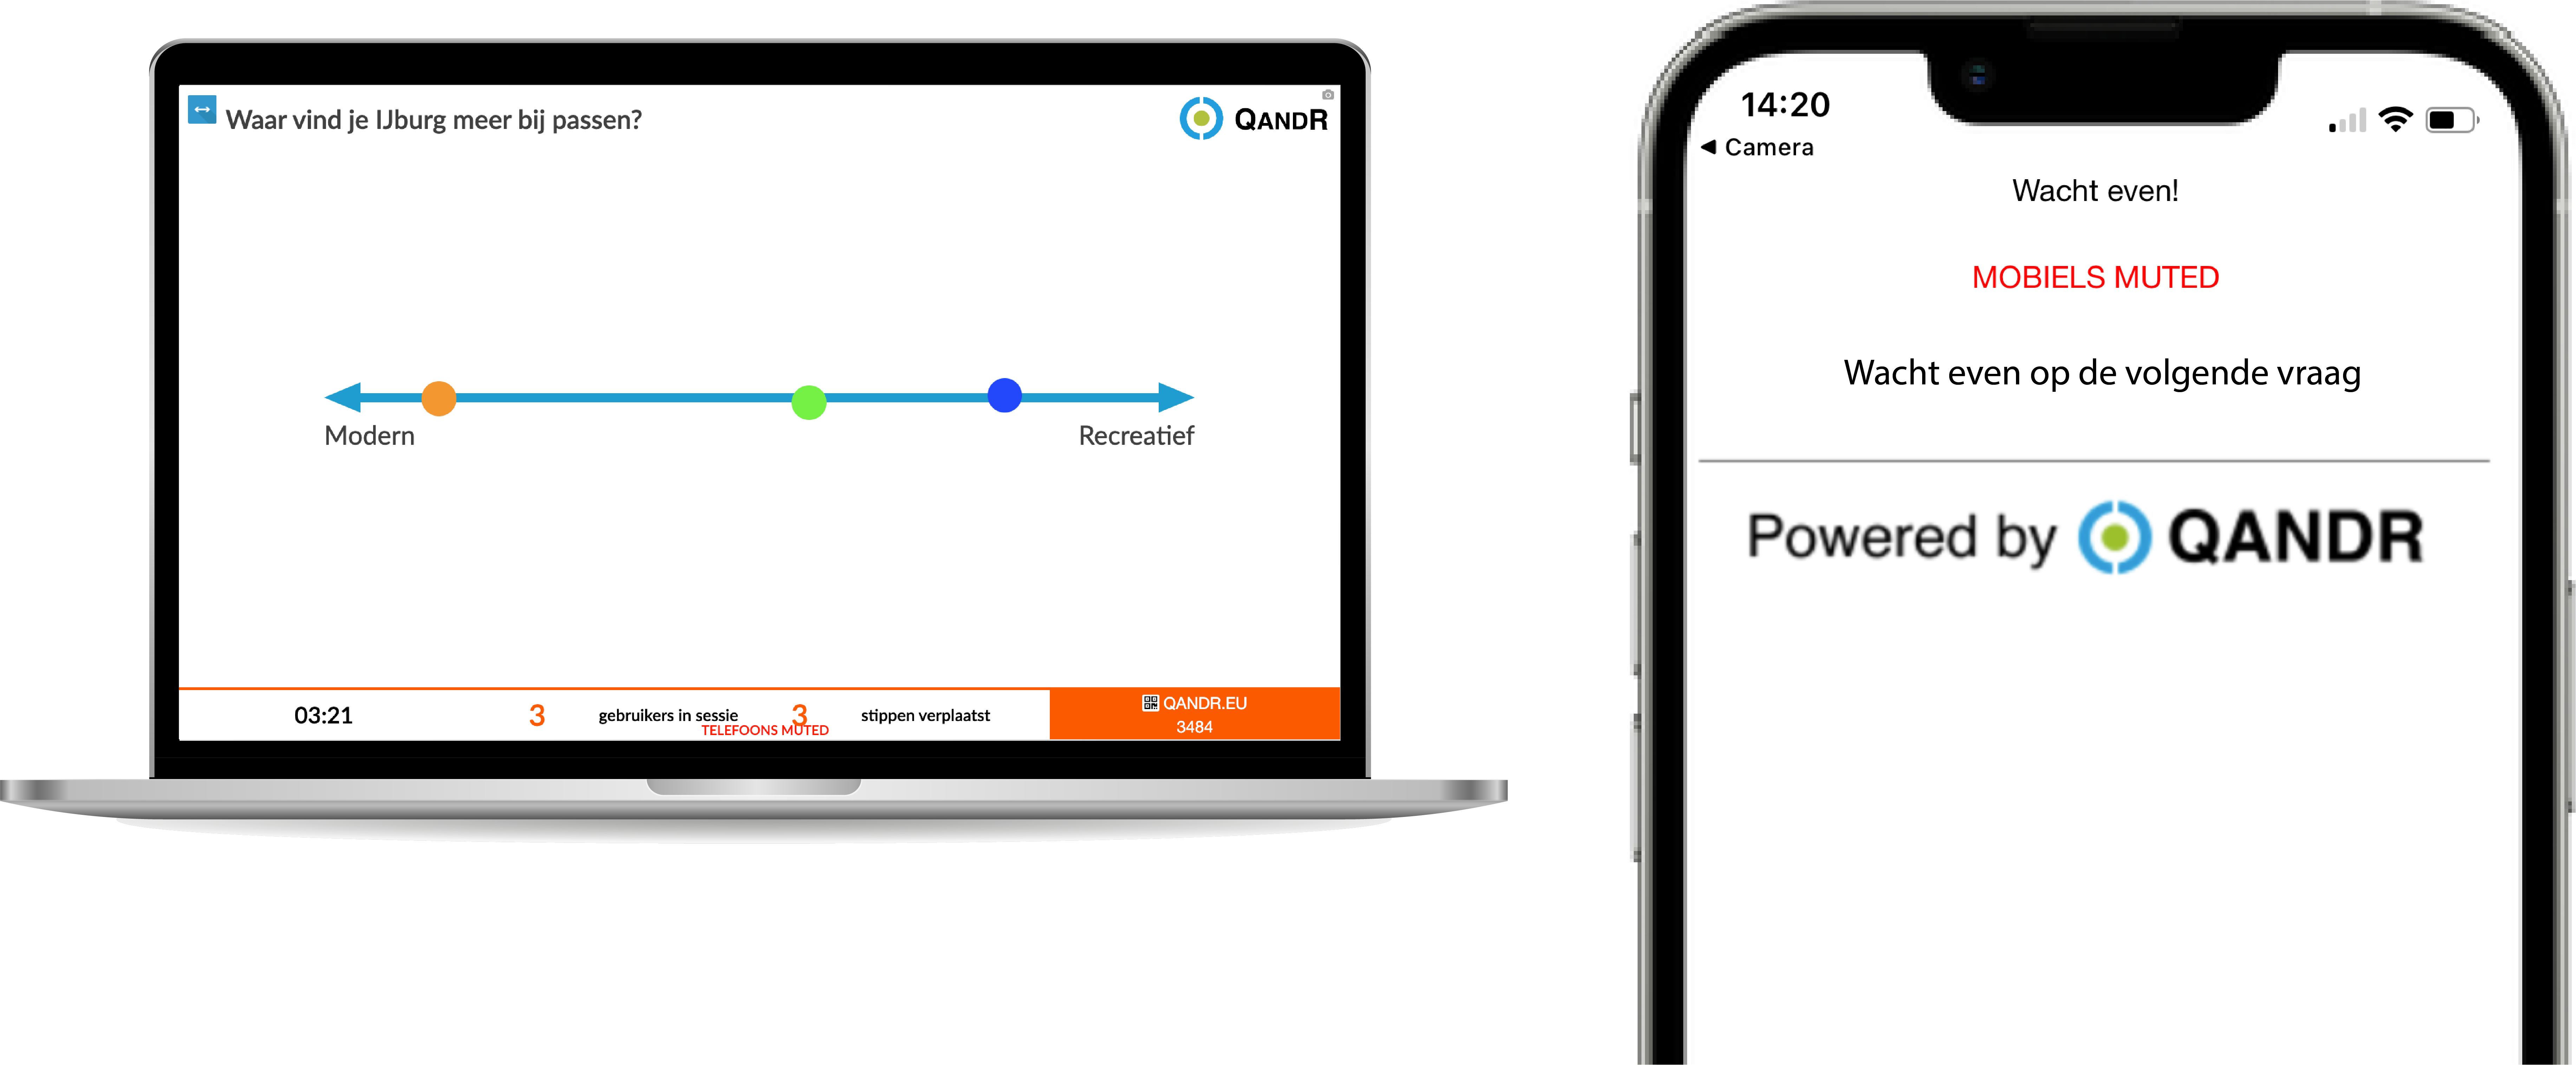
Yes, you can hide responses temporarily.
For many formats, you can enable the “no peer influence” option in the editor. This allows participants to answer a question first, without seeing the responses of others.
While this option is active, the main screen only shows that responses are coming in — not what people are submitting. When you’re ready, you can reveal the results and discuss them together.
This is especially useful in situations where you want independent input first, such as in research or when exploring different perspectives.
The no-peer influence option is currently available for the Poll, the Wordcloud, the Grading and the Moodboard, the Dilemma and the Quadrant. You can activate it in the editor by checking the 'no peer influence' box.
Yes, you can pause participant input during a session.
You can use the M key (mute) or the P key (pause) on your keyboard to temporarily stop new responses from coming in.
This can be useful if you want to take a moment to discuss results, give instructions, or bring focus back to the group before continuing.
Yes, QandR works well in a walk-in setting.
In this case, you keep your session open for a longer period, allowing participants to join at different times. A practical way to do this is by using the Presenter QR code.
This is a fixed QR code that you can generate in your dashboard. You can print it or display it on a screen, so participants can scan it as they arrive.
If no session is active yet, participants will see a waiting screen on their phone. As soon as you start the session, they will automatically join.
This setup makes it easy to create a continuous flow, where people can join and participate at their own pace.

If someone can’t connect, there are a few simple things you can try.
Ask the participant to refresh the page or open the link again, preferably in a modern browser such as Chrome or Safari.
If that doesn’t help, switching between Wi-Fi and mobile data can sometimes solve the issue.
In most cases, these steps are enough to get people connected quickly.
Typically, up to several hundred participants can join a session at the same time.
If you are planning a larger session, it’s best to contact our support team so we can help you set things up properly.
It’s also good to keep in mind that some formats work better with larger groups than others. Formats like Poll, Wordcloud and Grading scale well, while others — such as Pointer, Dilemma or Sticky Notes — are often more suitable for smaller groups or more in-depth sessions.